How To Set Up Fishing Rod For Trout Beginners Guide
Setting up a trout fishing rod is easier than you think. This guide walks you through every step, from picking the right rod and reel to tying on hooks, adding bobbers, and adjusting depth. Follow these simple instructions and you will be ready to catch trout in no time, even if this is your very first fishing trip.
Introduction
Trout fishing is one of the most rewarding outdoor activities you can try, but getting started can feel overwhelming. The good news is that learning how to set up a fishing rod for trout is a simple process that anyone can master with a little guidance. In this guide, you will learn exactly how to choose your gear, attach the reel, spool the line, tie on terminal tackle, and adjust your setup for maximum success. By the end, you will have a complete trout rig that is ready to cast.
- Match your gear to trout size: Use a 5 to 6.5 foot ultralight rod with a 500 to 1000 size spinning reel for the best trout experience.
- Use light line: Trout have sharp eyes, so 4 to 6 pound monofilament line is the sweet spot between strength and invisibility.
- Thread line correctly: Always open the bail before threading line through the guides to avoid twists that cause tangles.
- Wet your knots before tightening: This reduces friction and heat, making your knots stronger and more reliable.
- Set the bobber depth wisely: Place the bobber about 12 to 18 inches above the hook so bait floats near the trout’s feeding zone.
- Match the hatch: Use baits like PowerBait, worms, or small spinners that look like what trout naturally eat in your area.
- Maintain your setup: Rinse your rod and reel after every trip to prevent corrosion and keep the reel spinning smoothly.
Quick Answers to Common Questions
What time of day is best for trout fishing?
Early morning and late evening are the best times. Trout feed more actively in low light and when the water is cooler.
Should I use a bobber for trout?
Yes, a bobber helps you see bites and keeps your bait at the target depth. It is one of the easiest setups for beginners to learn on.
What bait is irresistible to trout?
PowerBait, salmon eggs, and live worms are proven favorites. Small spinners and spoons also work well when trout are aggressive.
How often should I retie my hook knot?
Retie every 10 to 15 casts, or anytime you catch a fish. Knots weaken over time and after repeated casting stress.
Can I use a heavier line for trout fishing?
You can, but it is not recommended. Trout have excellent vision, and heavy line looks unnatural in clear water. Stick with 4 to 6 pound line for the best results.
📑 Table of Contents
- What You Will Need
- Step 1: Pick the Right Rod and Reel
- Step 2: Attach the Reel to the Rod
- Step 3: Spool the Reel with Line
- Step 4: Thread the Line Through the Rod Guides
- Step 5: Tie a Leader and Attach the Hook
- Step 6: Add Split Shot Weights and Bobber
- Step 7: Adjust Depth and Start Fishing
- Troubleshooting Common Setup Issues
- Maintenance and Next Steps
What You Will Need
Before you start, gather all the gear. Having everything ready makes the process smooth and quick.
- Spinning rod and reel combo (5 to 6.5 feet, ultralight or light action)
- Monofilament fishing line (4 to 6 pound test)
- Trout hooks (size 8 to 12, barbed or barbless)
- Split shot weights (small, 1/32 oz or 1/16 oz)
- Bobber or float (small round or pencil style)
- Trout bait or lures (PowerBait, worms, or small spinners)
- Scissors or line cutters
- Needle-nose pliers (for hook removal)
Step 1: Pick the Right Rod and Reel
Choose a rod and reel that match the size of trout you plan to catch. A good starting setup is a 5 to 6.5 foot ultralight spinning rod paired with a 500 to 1000 size spinning reel. This combo casts light baits easily and feels great when a trout strikes.
Visual guide about how to trout fishing rod setup
Image source: badangling.com
Hold the rod in your hands and make sure it feels comfortable. Check the reel seat (the part where the reel mounts) and confirm it fits your reel foot snugly. A wobbly fit causes poor casting and makes it harder to set the hook.
Pro Tip: Avoid heavy tackle. Trout are not huge fish, and using a heavy setup makes it harder to cast small baits and takes away the fun fight. Ultralight gear gives you better sensitivity so you feel even the lightest nibble.
Step 2: Attach the Reel to the Rod
Now it is time to put the reel on the rod. Line up the reel foot with the reel seat on the rod handle. Slide the reel into the seat with the bail arm (the wire loop) facing up and the handle on the left or right side depending on your dominant hand.
Visual guide about how to trout fishing rod setup
Image source: badangling.com
Turn the locking rings on the reel seat to tighten them down. Start with the top ring, then the bottom ring. Continue turning until the reel feels locked in place. Give it a gentle tug to test the fit.
Pro Tip: Do not over-tighten the reel seat. If you crank the rings too hard, you can strip the threads or crack the reel seat. Just make it snug enough that the reel does not wiggle.
Step 3: Spool the Reel with Line
If your reel is already spooled, skip this step and move to Step 4. Otherwise, you need to add line. Flip the bail arm open. Then thread the end of the fishing line through the smallest guide on the rod (the one closest to the reel) and tie it to the spool with an arbor knot.
Visual guide about how to trout fishing rod setup
Image source: islandfishermanmagazine.com
To tie an arbor knot, wrap the line around the spool once. Then tie a simple overhand knot around the main line, leaving a loop. Tie a second overhand knot on the free end of the line. Pull the main line tight so both knots cinch down against the spool.
Close the bail and place the line spool on the floor with the label facing up. Fork your fingers and pinch the line lightly a few feet from the rod, then start turning the reel handle. Let the line lay evenly across the spool. Add line until the spool is filled to about 1/8 inch from the rim.
Pro Tip: Always keep a light pinch pressure on the line while reeling. This creates tension so the line wraps tight and does not dig into itself during casting. Fill the spool to the proper depth, leaving a small gap at the top edge.
Step 4: Thread the Line Through the Rod Guides
Close the bail and pull the line through each guide, starting from the one closest to the reel and moving toward the tip. Push the line through each eyelet one by one. Take your time and make sure the line does not wrap around the rod shaft.
Pull a few feet of line through the tip guide so you have slack to work with. Now grab the line and give it a hard tug to make sure the spool knot is secure. If the knot slips, open the bail and re-tie it.
Pro Tip: Check that the line sits inside the foot of each guide, not just resting on top. If the line touches the guide frame instead of the ceramic insert, it may fray over time. Pull the line tight and run your fingers over each guide to verify the flow.
Step 5: Tie a Leader and Attach the Hook
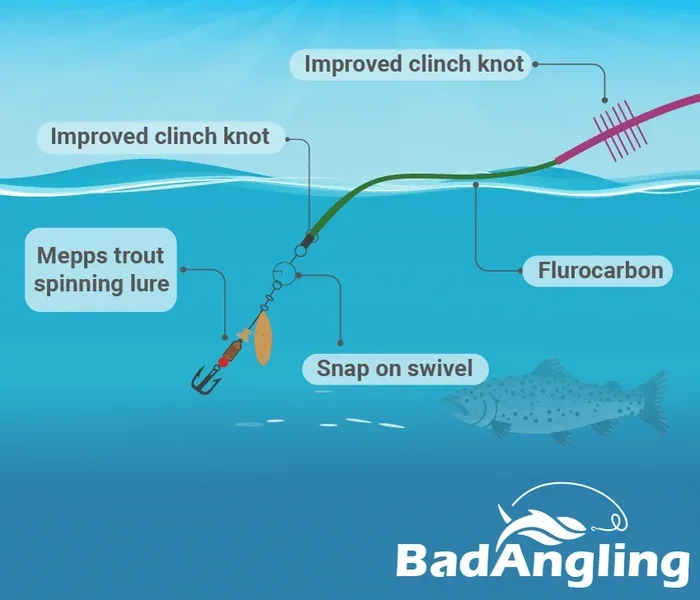
A leader is a short section of line that connects your main line to your hook. It helps make the setup less visible to wary trout. Cut a 2 to 3 foot piece of 4 pound fluorocarbon or monofilament leader (or you can skip the leader and tie directly to your main line to keep things simple).
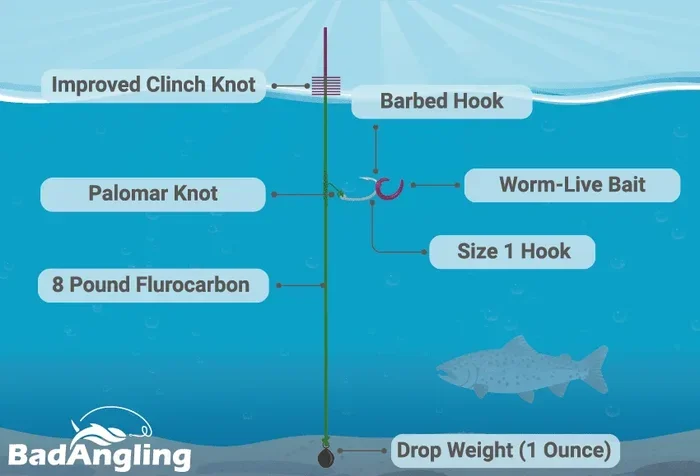
Tie the leader to the main line using a double surgeon’s knot or an improved clinch knot. Then tie a small trout hook to the other end of the leader. Wet the knot with saliva or water before pulling it tight. Trim the tag end with your scissors.
Pro Tip: A barbless hook is easier to remove from a trout’s mouth and reduces harm to the fish. If you plan to catch and release, pinch the barb down with pliers. This makes hook removal quick and helps trout survive after release.
Step 6: Add Split Shot Weights and Bobber
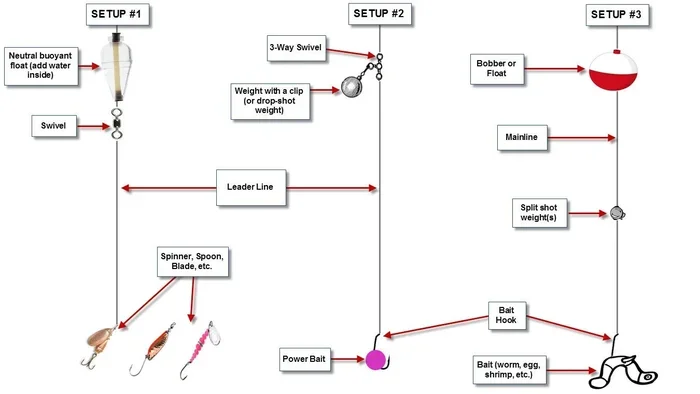
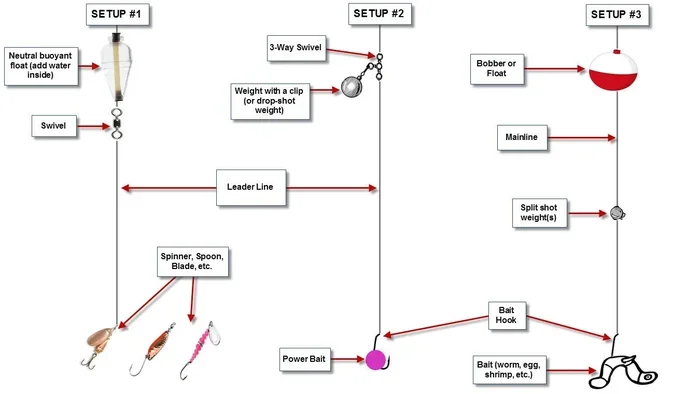
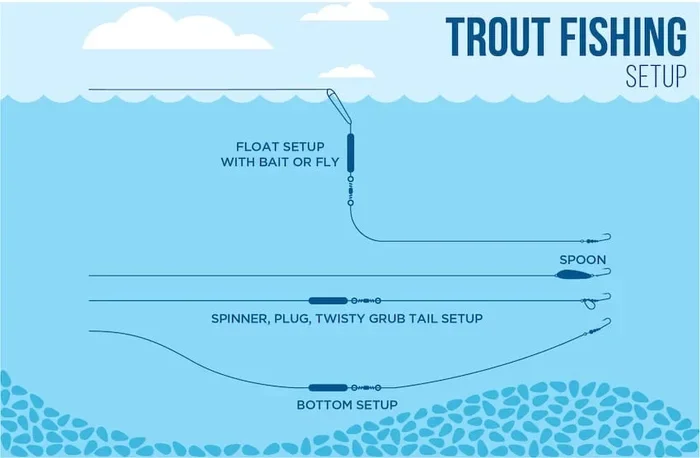
Now you will build the bobber rig that keeps your bait at the right depth. Slide a small bobber onto the line and attach it with the included rubber band or clip. Then pinch one or two small split shot weights onto the line about 6 to 8 inches above the hook.
Place the split shot on the line and squeeze it with pliers. Do not squeeze too hard, or you will crush the line and weaken it. The weight should be just snug enough to stay in place when you cast.
Pro Tip: Put the bobber first, then the split shot, then the hook. This ordering keeps the bobber upright and allows the bait to float naturally below. Add weights gradually, one at a time, until the bobber sits about 70 percent underwater.
Step 7: Adjust Depth and Start Fishing
Set the depth of your bait by sliding the bobber closer to or farther from the hook. For trout, a depth of 12 to 18 inches between the bobber and the hook is a good starting point. This keeps the bait within the trout’s striking zone in most lakes and ponds.
Cast your rig by pressing the release button on the reel, pulling the line with your index finger, and smoothly flicking the rod forward. Let the bait sink, then watch the bobber. When it goes under or twitches sideways, it is time to set the hook. Give a quick, sharp lift of the rod tip.
Pro Tip: If you have no bites after 30 minutes, adjust the depth. Slide the bobber up the line to drop the bait deeper, or try casting to a different area. Trout often hold near structure like submerged logs, rocks, and drop-offs. Change your bait color or scent if the trout are picky.
Troubleshooting Common Setup Issues
Tangles and Line Twists
Line twists happen when the spool is overfilled or the line was wound on the wrong way. If you see loops or tangles, take the line off the reel and respool it with the label side up. Always close the bail by hand after casting, not by turning the handle, to prevent twists.
Line Keeps Breaking
If the line snaps during casting or when a fish bites, check for nicks and frays on the line near the hook. Retie your knots regularly. Small line damage also occurs from passing over rocks and underwater debris. Inspect the line every few casts and re-tie when it looks worn.
Bobber Sinks Completely
If your bobber disappears under the surface without a fish, you have too much weight or the bobber is too small. Remove a split shot weight or switch to a larger bobber. Aim for the bobber riding mostly above the water so you can see strikes clearly.
Maintenance and Next Steps
After a day of fishing, take a few minutes to care for your gear. Rinse the rod and reel with fresh water to remove dirt, sand, and salt. Wipe them dry with a soft cloth. Open the bail and loosen the drag knob on the reel so the internal parts can air out. Store the rod vertically or in a padded case to prevent damage.
Your next step is to practice. Head to a local pond, lake, or stocked stream and try casting in open water. Observe how the bobber sits and how the bait behaves. Practice adjusting the depth until you find a rhythm. The more you fish, the more confident you will become at reading the water and finding trout.
Conclusion
Learning how to set up a fishing rod for trout is the first step to a lifetime of enjoyable fishing. With the right gear, a few simple knots, and patience, you will be ready to hit the water and test your new skills. Remember to keep your setup simple, check your line often, and adjust depth until you get bites. Now grab your rod and go make some memories on the water.