How To Set Up Fishing Rod For Trout Step By Step
Setting up a fishing rod for trout is easier than you think. Match your rod, reel, and line, then tie a simple hook, bobber, and split shot rig. Practice your knots and check the drag before you cast to avoid losing fish and gear.
Trout fishing is one of the most rewarding ways to spend a morning outdoors. But before you make that first cast, you need to know how to set up a fishing rod for trout the right way. A proper setup helps you cast farther, detect bites sooner, and land more fish without breaking your line.
In this guide, you will learn every step. You will pick the right gear, spool fresh line, thread your rod guides, tie strong knots, and build both bait and lure rigs. By the end, you will feel confident assembling your rod and hitting the water.
- Match your gear: Use a light or ultralight spinning rod with a matching reel spooled in 4–6 lb monofilament for trout.
- Fresh line matters: Replace old line each season to prevent breaks, frays, and memory coils that cause tangles.
- Thread every guide: Run the line through all rod guides from the reel up to the tip-top to reduce friction and snags.
- Master one knot: The improved clinch knot is the only knot you need to tie hooks, lures, and swivels.
- Set the drag properly: The drag should slip before the line breaks so you can fight trout without snapping off.
- Use the right rig: Bobber-and-worm works for stocked trout, while a sliding sinker rig suits PowerBait.
- Check your setup: Always make a test cast and inspect for tangles or loose connections before fishing.
Quick Answers to Common Questions
What is the best line strength for trout?
Stick with 4 to 6 pound monofilament. It is strong enough to land most stocked trout, yet thin enough for natural presentations and long casts.
How long should my leader be?
Keep a 2 to 4 foot leader between your main line and the hook. Fluorocarbon leaders work well in clear water because they are almost invisible.
What time of day is best for trout fishing?
Early morning and late evening are the top times. Trout feed aggressively in low light and cooler water temperatures.
Can I use a lure without a bobber?
Yes. Spinners, spoons, and small crankbaits work well when tied directly to your line. The weight of the lure does the work for you.
How do I know if I have the right rod action?
Test the rod by flexing it. A light-action rod bends near the tip, while a medium action bends in the middle. For trout, light action is ideal for detecting bites and protecting thin line.
📑 Table of Contents
- What You Will Need
- Understand Your Trout Setup Before You Start
- Step 1: Assemble the Rod and Reel
- Step 2: Spool the Reel with Fresh Line
- Step 3: Thread the Line Through the Rod Guides
- Step 4: Tie the Improved Clinch Knot
- Step 5: Set Up a Bobber and Worm Rig
- Step 6: Try a Lure Rig with Spinners
- Step 7: Set the Drag and Make a Test Cast
- Troubleshooting Common Setup Problems
- Maintenance After Your Trip
- Conclusion
What You Will Need
Gather these items before you start. Having everything ready makes the process smooth and fast.
- Spinning rod and reel combo (6 to 7 feet, light or ultralight action)
- Monofilament fishing line (4 to 6 pound test)
- Size 8 or 10 baitholder hooks
- Small split shot weights (1/8 oz or smaller)
- Plastic bobbers or floats
- PowerBait, worms, or small spinners
- Line cutters or scissors
- Hemostats or a small pliers (optional)
Understand Your Trout Setup Before You Start
Trout have soft mouths and keen eyesight. That is why light line and a flexible rod are the norm. A light-action rod bends near the tip, which protects thin line and keeps hooks from tearing out during a fight. A stiff rod with heavy line will spook trout in clear water and cause more missed hooksets.
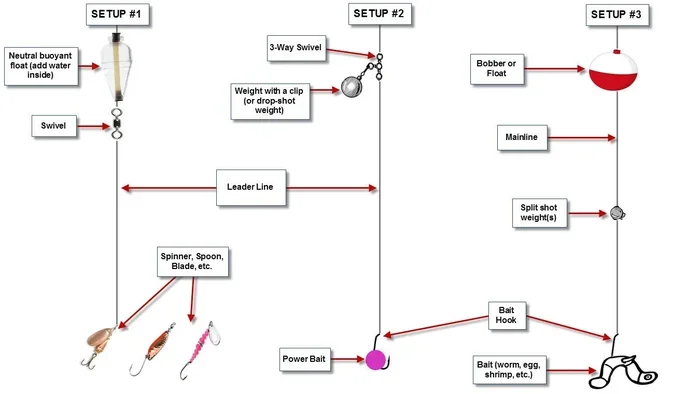
Visual guide about how to trout fishing rod setup
Image source: badangling.com
Your reel should be a spinning reel sized 1000 to 2500. These reels balance perfectly with light rods and hold enough line for stream or lake fishing. When you match the rod, reel, and line correctly, your setup feels like an extension of your arm.
Step 1: Assemble the Rod and Reel
Twist the rod sections together if it is a two-piece rod. Align the guides so they sit in a straight line. They should point upward or toward the side, never spiraling around the blank.
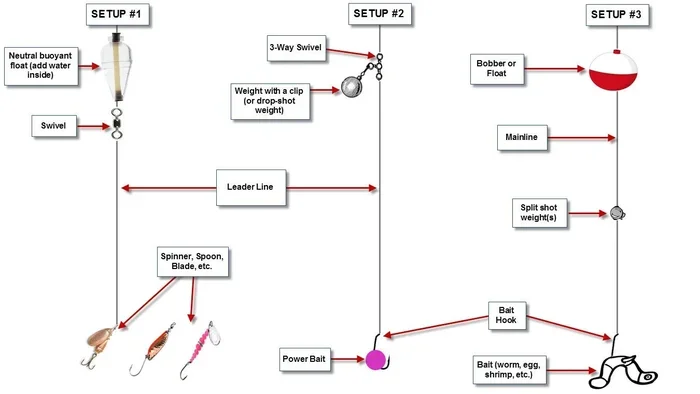
Visual guide about how to trout fishing rod setup
Image source: badangling.com
Attach the reel to the reel seat. Loosen the locking rings, slide the reel foot into the seat, and tighten the rings until the reel feels snug. Wiggle it gently. Thеre should be no wobble.
Align the reel so the bail arm faces the rod guides on the same side. This keeps the line flowing straight off the spool without rubbing against the rod.
Hold the rod with your casting hand before you fully tighten the reel. The reel handle should hang downward. If it feels twisted, loosen the rings, rotate the reel, and retighten.
Step 2: Spool the Reel with Fresh Line
Old line develops weak spots, coils, and tangles. Fresh 4 to 6 pound monofilament is the best starting point for trout fishing. It is thin and nearly invisible in the water, yet strong enough for most trout.
Visual guide about how to trout fishing rod setup
Image source: islandfishermanmagazine.com
Open the bail arm by flipping it upward. Thread the line through the first guide on the rod, then tie an arbor knot to the spool. To tie it, wrap the line around the spool once, tie a loose overhand knot around the main line, then pull it tight. Snug the knot against the spool.
Close the bail arm and start reeling slowly. Press your finger on the line as it winds on to create tension. Fill the spool until the line sits about 1/8 inch below the spool lip. Too much line causes tangles. Too little line cuts casting distance.
Pro Tip
Run the line through a damp cloth as you reel. This adds friction and pressure, helping the line lay flat and tight on the spool. If your line twists as it fills, flip the filler spool over and start again.
Step 3: Thread the Line Through the Rod Guides
Now route the line from the reel through every guide on the rod. Start at the guide nearest the reel and work your way toward the tip-top.
Pull enough line off the reel to reach the tip. Pass the line through each guide ring, one at a time. Do not skip any guide. Skipping guides creates dangerous friction points that weaken your line.
After you pass through the tip-top guide, close the bail arm. Pull the line tight and inspect the path. There should be no loops or twists between the guides. A straight path means smoother casts and fewer tangles.
Pro Tip
Moisten the line before pulling it through the tip-top guide. This reduces friction heat, which can weaken the line. Also, make sure the line sits inside the guide rings, not wrapped around the rod blank.
Step 4: Tie the Improved Clinch Knot
This one knot connects your line to hooks, lures, and swivels. It is simple and reliable.
Thread the line through the eye of the hook. Make 5 to 7 wraps around the standing line. Then pass the tag end through the small loop near the hook eye. Now pass it through the big loop you just created.
Moisten the knot with water or saliva. Pull the tag end slowly while pressing the wraps together. Tighten it fully, then trim the tag end to about 1/8 inch.
Pro Tip
Always wet the knot before tightening. A dry knot burns and weakens the line as it cinches. Test the knot by pulling firmly on both ends. If it slips, retie it before you lose a fish.
Step 5: Set Up a Bobber and Worm Rig
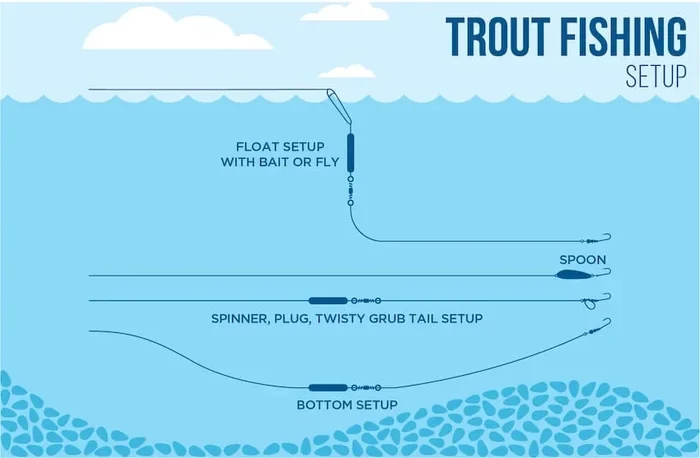
For stocked trout, a bobber rig is simple and very productive. It suspends your bait at a set depth and signals even the lightest nibble.
Attach the Bobber
Slide a clip-on or slip bobber onto your main line. Set the depth 2 to 4 feet from the hook. Clip it firmly so it holds in place even when you cast hard.
Tie on the Hook
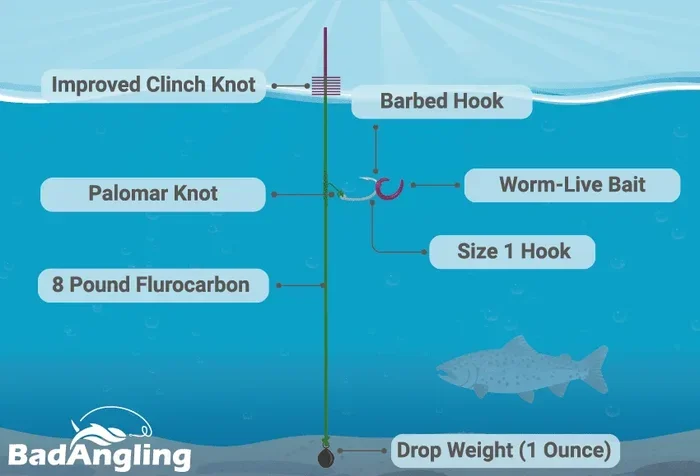
Use your improved clinch knot to tie a size 8 baitholder hook to the end of the line. Wet the knot and tighten it slowly. Trim the tag end.
Add Split Shot
Pinch one small split shot onto the line about 12 inches above the hook. Use your pliers or teeth. The weight should be just enough to keep the bait near the bottom without sinking the bobber.
Bait the Hook
Thread a small piece of worm onto the hook, covering the shank but leaving the point exposed. For PowerBait, roll a pea-sized ball and press the hook point through the center so it floats just above the bottom.
Pro Tip
Set the bobber depth so the hook dangles just off the bottom. Trout often feed on or near the bottom, so let the bait hover close to them. If you get no bites in 20 minutes, slide the bobber deeper.
Step 6: Try a Lure Rig with Spinners
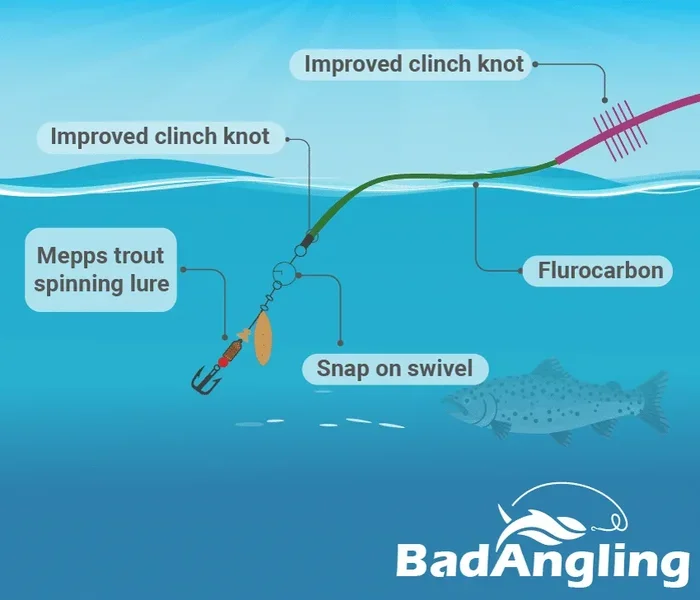
If you like casting and reeling, attach a small spinner like a Rooster Tail or Mepps. The setup takes seconds because the lure ties directly to your line.
Tie the spinner on with the improved clinch knot. Check the hook point for sharpness. A dull hook ruins hooksets.
Cast out and reel in a steady pace. Speed up or slow down until the blade spins freely. You will feel the vibration in your rod tip. Pause occasionally to let the lure flutter, a trick that often triggers strikes.
Pro Tip
Add a small barrel swivel 12 to 18 inches above the spinner. This prevents line twist during long casts and lively retrieves, keeping your line tangle-free all day.
Step 7: Set the Drag and Make a Test Cast
Before you fish, set your drag. Pull line from the spool by hand. It should come out with steady, smooth resistance.
Turn the drag knob in small increments until the line slips under firm pressure but holds under light pressure. The drag protects your line when a trout makes a strong run.
Make a practice cast in open water. Watch how the line flows and how the bait swims. If the bobber tips sideways, adjust your split shot placement. If the line coils, check for twists.
Pro Tip
When you get a bite, point the rod at the fish and reel down quickly. Then snap the rod tip upward sharply. This sweep sets the hook into the trout’s mouth without breaking light line.
Troubleshooting Common Setup Problems
Line Keeps Twisting
This happens when you spool the reel the wrong way or when the bait spins your line. Fix it by re-spooling with the line spool label facing up. Add a swivel to stop future twist.
Knots Keep Slipping
Most slipping knots are not tightened enough or not lubricated. Always wet the knot before cinching down. Pull the tag end and standing line in opposite directions while pressing the coils together.
Bobber Lies Flat in the Water
Your split shot is too heavy or the bobber is too small. Remove one split shot or slide the bobber higher on the line until it floats upright.
Hooks Blunt Too Fast
Trout rocks and gravel dull hooks quickly. Press the hook point against your fingernail. If it slides, sharpen it with a hook file or replace the hook. Sharp hooks mean more hooksets land.
Maintenance After Your Trip
Rinse your rod and reel with fresh water after every trip. This removes dirt, sand, and debris that wear down moving parts. Dry the rod with a soft cloth.
Open the bail arm and let the line dry before spooling it back in. Moisture trapped on the spool causes memory and weak spots. Reel the line snugly, but not so tight that the spool deforms.
Inspect your hooks and lures for rust. Replace any dull or corroded hooks. Apply a drop of reel oil to the handle and bail joint to keep the action smooth. With this simple care, your gear will fish well for years.
Conclusion
Learning how to set up a fishing rod for trout is a skill that pays off every time you hit the water. You now know how to assemble your gear, spool fresh line, thread the guides, tie reliable knots, and build a rig that catches fish.
Practice these steps at home before your next trip. Tie a few knots, set the bobber, and make a test cast in the yard. The more you practice, the more automatic the process becomes.
Next time you head to the lake or river, you will spend less time fiddling with gear and more time catching trout. Tight lines.